User’s Manual
This document contains in-detail explanations about everything you can do with DiscoDOS. If you’d like to see how to do typical day to day tasks, jump to the Common Tasks section on the README page, and come back here later.
General things about command line tools
In case you don’t use command line tools much: disco is designed as such and thus each option has a short form and a long form. For example the help output of the disco main command can be written two ways:
disco --help or disco -h
another example:
disco suggest --bpm 123 is the same as disco suggest -b 123
Throughout this section, mostly the short forms are used, but sometimes the long forms too because they’re just more self-explanatory.
Also a common concept with command line tools is that “optional arguments” (the ones starting with a dash) can be put before or after “positional arguments (in this case the mix_name):
disco mix new_mix -c is the same as disco mix -c new_mix
Also the order of “optional arguments” is freely choosable most of the time:
disco search "search terms" -m new_mix -t A2
is the same as
disco search "search terms" -t A2 -m new_mix
disco - the main command
DiscoDOS’ main command is disco, to view it’s help:
disco -h
It contains four subcommands, namely: mix , suggest, import, search
To execute a subcommand you would eg type:
disco search ...
Each subcommand has its own built-in help output:
disco mix -h
disco suggest -h
disco import -h
disco search -h
disco - global switches
The general behaviour of disco can be altered by some “optional arguments”:
Enable INFO logging output or DEBUG logging output on your terminal (usually only relevant if you’re investigating errors, are a developer or just want to know what DiscoDOS is doing under the hood):
enable INFO logging (-v) or DEBUG logging (-vv) output:
disco -v ... or disco -vv ...
DiscoDOS checks if it’s online automatically but can be forced to stay in offline mode:
disco -o ...
The disco subcommands
Each subcommand has its typical purpose but some actions can be executed from within other subcommands as well.
This chart gives some examples of what each subcommand can do:
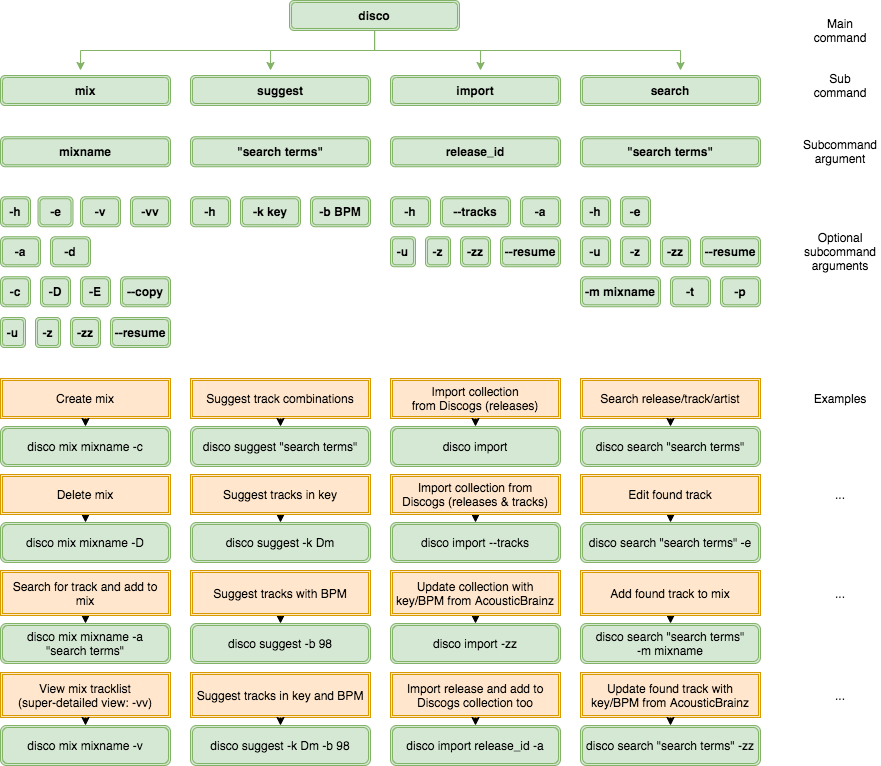
The mix command
A mix is basically just a list of tracks in a specific order, a playlist, a track pool, you name it.
Create a mix. You will be asked to put in general info about the mix (venue, last played date). Make sure the played date is in the format YYYY-MM-DD:
disco mix my_mix -c
Delete a mix (yes, it’s a capital D):
disco mix my_mix -D
Copy a mix. You will be asked for the name of the copy. (Note: –copy doesn’t have a short form option):
disco mix my_mix --copy
Edit general mix info (venue, played date):
disco mix my_mix -E
Add a track to a mix. You will be asked for the track number on the found release. Note: Tracks can be added using the search command as well:
disco mix my_mix -a "search terms"
To add the track at a specific position in the mix, rather than at the end:
disco mix my_mix -a "search terms" -p 3
Edit details or 3rd track in the mix (key, key_notes, BPM, transition rating, transition notes, track notes, position in the mix, track number on the record, custom MusicBrainz recording ID):
disco mix my_mix -e 3
Delete 3rd track in the mix:
disco mix my_mix -d 3
Bulk-edit selected fields of all tracks in a mix. You can cancel editing without data loss by pressing ctrl-c. Data is saved after each track.
disco mix my_mix -b trans_rating,bpm,key
Available field names: key,bpm,track_no,track_pos,key_notes,trans_rating,trans_notes,notes,m_rec_id_override (Make sure your field list has only commas and no spaces in between!)
To start bulk-editing at a specific track position rather than at track 1:
disco mix my_mix -b trans_rating,bpm,key -p 3
Get track names for whole mix from Discogs:
disco mix my_mix -u
Start getting track names at position 3 in the mix, rather than at track 1:
disco mix my_mix -u -p 3
Get additional track info for whole mix from MusicBrainz/AcousticBrainz (key, bpm, links):
disco mix my_mix -z
Start getting MusicBrainz/AcousticBrainz info at position 3 in the mix, rather than at track 1:
disco mix my_mix -z -p 3
Run a “detailed *Brainz match” (more likely to find matches but significantly slower)
disco mix my_mix -zz
Get track names for all tracks in all mixes from Discogs:
disco mix -u
Get MusicBrainz/AcousticBrainz info for all tracks in all mixes from Discogs. Do a “detailed *Brainz match” run:
disco mix -zz
*Brainz matching is a tedious process for DiscoDOS (more details on this here), if you have to switch off your computer for any reason while it’s running, cancel the process using ctrl-c and it later at the given position (in this example track number 150 in the list of all tracks in all mixes):
disco mix -zz --resume 150
The suggest command
The suggest command helps a DJ find possible track combinations by reporting how a track has been used in the past or by finding tracks fitting with certain criteria. Fun fact: These features were the initial ideas for writing a program like DiscoDOS.
Find out in which combinations a track ever was played by looking through all your mixes. This command does a regular search in the collection, spits out a “first match” release and asks for a track number on the release. The presented output shows “snippets” of mixes, telling you exactly which tracks you have used before and after the selected track:
disco suggest "amon tobin kitchen sink"
Show all tracks in collection containing “Dm” (D minor) either in the user-key or AcousticBrainz keys fields (key, chords_key).
disco suggest -k Dm
DiscoDOS allows a user to put in more than one key in the user-key field. Information like “Am/Dm/Gm” is allowed. To find this information the following search could be used. Note the wildcard character being the percent sign (%):
disco suggest -k "Am%Gm"
Certainly the a record with “Am/Dm/Gm” in the user-key field would also be found by a simple search like this:
disco suggest -k Am
Find all tracks in collection with a BPM around 120. The pitchrange of a typical turntable is taken into account. Currently this is hardcoded to +/-6 percent (this will be a user-configurable value in future DiscoDOS versions):
disco suggest -b 120
key and BPM search can be combined:
disco suggest -k Dm -b 120
Note: The key and BPM suggest commands require sufficient information in the DiscoBASE. Either in the user-editable key and BPM fields or in the AcousticBrainz fields
Read how to automatically fill these fields with data from AcousticBrainz in the following section about the import command.
The import command
You can update your DiscoBASE from your Discogs collection at any time, if data is already existing, it will be updated. Due to the Discogs API being not the fastest, it takes some time though. There are other ways for adding single releases to Discogs AND to your DiscoBASE simultaneously.
Note: This imports all your releases, but not the tracks on them
disco import
A quicker alternative, if you are about to import just a couple of new releases is to use the -a option. The release will be added to your Discogs collection and also imported to DiscoBASE. To get the Discogs release ID, just head over to discogs.com, search for the release. You will find the release ID in the URL of the release (eg https://www.discogs.com/release/123456).
Note: You don’t have to click “Add to Collection” on discogs.com, DiscoDOS does this for you
disco import -a 123456
To add a release to DiscoBASE only (because it’s been already added to your collection via the Discogs web interface), just use the import command with a release ID attached. (Note: Unfortunately this way it takes significantly longer because of drawbacks in how the collection data is accessible via the API):
disco import 123456
To import all releases including all tracks in your collection use the –tracks option (can be replaced by its short form -u). 1000 records take about 20-30 minutes to import:
disco import --tracks
To add additional data to your tracks from MusicBrainz/AcousticBrainz (key, BPM, links) use the -z option. Your releases will then be “matched” one-by-one with MusicBrainz - this is not the easiest task for DiscoDOS, several things have to be “tried” to get it right. Differences in spelling/wording of catalog number, artists, title, track numbers, track names in MusicBrainz compared to Discogs are the main reason why it takes that long:
Note: This process will take hours. Best you let it run “overnight”
disco import -z
An even more detailed “matching” is done by “doubling the -z option”. It takes significantly longer and you will get more results but still: Don’t expect to find a match for all of your releases. Please take a minute and report back how the matching went by opening a github issue:
disco import -zz
Also remember that it’s unlikely that MusicBrainz even has an entry for each of your records. Discogs still is the most complete music database on earth compared to others. Most definitely when it comes to Vinyl records.
Also note that often it happens that a MusicBrainz track can be “matched” but AcousticBrainz does not have an entry for it yet.
If for some reason you can’t complete the run (connection problems, having to switch of your computer, …) you can resume the process at a later time. DiscoDOS spits out regularly how many tracks have been matched already and how many are to be done. This will resume the matching at track number 2500 in your collection:
disco import -zz --resume 2500
The “*Brainz match process” currently adds the following data to releases:
Release MusicBrainz ID (Release MBID)
weblink to the MusicBrainz release
and the following data to tracks:
BPM
key
chords key
Recording MusicBrainz ID (Recording MBID)
weblink to the MusicBrainz recording (A track is called a recording in “MusicBrainz speak”)
weblink to the AcousticBrainz recording (AcousticBrainz uses the same recording MBID as MusicBrainz - this is the link between the two services!)
The search command
As the name implies, this command searches in your collection. By default it uses the Discogs API to search for release names, track names, track artists, catalog numbers and labels.
To search an album of artist “Amon Tobin” you would type:
disco search "Amon Tobin Foley Room"
You will see the Album’s details and its contents.
Note: The online search is designed “first match”
So this gives you the first found “Amon Tobin” album in your collection only. You have to be more specific to find a particular album:
disco search "Amon Tobin"
If you currently are not connected to the internet or you enable “offline mode” the search command behaves differently: Your search terms are only applied against the release title and the release artist(s), but not the track name. There is a reason for this: DiscoDOS by default does not import track name. Even though certainly you have the option to import track names, the search does not rely on this. Maybe this behaviour changes in future releases. It was a design decision in the first DiscoDOS prototype versions.
Note: The offline search shows a “list of matching items”
search command actions
To “do” something with a track on an album you need to append an “optional argument” to the command. The following actions can be applied to the found track:
“edit track” (option -e)
“add track to mix” (option -m)
“update from Discogs” (option -u)
“update from *Brainz” (option -z)
search action “edit track”
To edit the track’s details in the DiscoBASE you use:
disco search "Amon Tobin Foley Room" -e
You will see the album’s contents and be asked to put in a track number (eg A1, C2, …). Then you will be walked through all the “editable” fields. It’s pretty self-explanatory, but read the hints on the screen.
If you know which track number you’d like to edit already, provide it on the command line directly. You won’t be asked for the track number then:
disco search "Amon Tobin Foley Room" -e -t B2
search action “add track to mix”
The track you select on the found release will be added to the given mix-name:
disco search "Amon Tobin Foley Room" -m my_mix
If your mix’s name contains spaces, wrap it in double quotes:
disco search "Amon Tobin Foley Room" -m "my longish mix name"
As a shortcut you can always just use the mix’s ID number (you see the numbers in the output of the disco mix command):
disco search "Amon Tobin Foley Room" -m 27
Certainly also here you can provide the track number on the command line already. So to add track A2 on “Foley Room” to mix number 27:
disco search "Amon Tobin Foley Room" -m 27 -t A2
search action “update from discogs”
As already mentioned already, DiscoDOS is minimalistic by default. The default import command disco import just gets exactly this data from Discogs: release IDs, release titles, release artists, catalog numbers. To put track names of a particular track into the DiscoBASE as well you’d use:
disco search "Amon Tobin Foley Room" -u
Again, combination with -t is possible:
disco search "Amon Tobin Foley Room" -u t A2
To make all track names on all releases in your collection available offline, use:
disco search all -u
Note: This is exactly the same as using disco import --tracks or in short: disco import -u.
Read more on importing release and track information in the import command section
search action “update from *Brainz”
To extend a tracks information with data from MusicBrainz and AcousticBrainz:
Note: To make this work, the track must have been updated from Discogs with track names already. See update from Discogs action above.
disco search "Amon Tobin Foley Room" -z
If the track couldn’t be matched with the regular match command, try the “detailed match” command (takes more time, but chances on finding a match are higher):
disco search "Amon Tobin Foley Room" -zz
or as usual with track name already in the command:
disco search "Amon Tobin Foley Room" -zz -t A2
If you’ve already imported all your track’s names to the DiscoBASE, you could even try to update all tracks with MusicBrainz information (takes a couple of hours):
disco search all -z
disco search all -zz
Read more on the performance of the *Brainz match process and what exactely it imports in the import command section
discosync - The DiscoDOS backup & sync tool
discosync is used to save the DiscoBASE to the cloud and restore it if something went wrong. It also can be used to share it between multiple computers. There are currently two options, for storing the backups:
Dropbbox
A folder on a webserver
A little configuration hast to be done. Follow the steps in the Dropbox configuration chapter or the Webserver configuration chapter
Depending of your chosen way of saving backups you have to launch discosync differently; Option -t selects which type of storage should be accessed:
discosync -t dropbox ...
discosync -t webdav ...
The “types” can be abbreviated:
discosync -t d ...
discosync -t w ...
Backup
The backup command is straight forward and does not require any user-interaction after launching:
To backup to your Dropbox:
discosync -t d --backup
or use its short form: discosync -t d -b
Dropbox currently is the hardcoded default “storage type”, so actually it’s sufficient to run:
discosync -b
Note: The default backup storage type might be configurable in future DiscoDOS releases
To backup to a WebDAV folder:
discosync -t w --backup
short form: discosync -t w -b
Viewing existing backups
Dropbox:
discosync --show
or short: discosync -s
WebDAV:
discosync -t w --show
or: discosync -t w -s
Restore
Restoring your database from a backup is an interactive process - you will be asked which backup you’d like to restore and warned that your local discobase.db file would be overwritten.
Dropbox:
discosync --restore
or short: discosync -r
WebDAV:
discosync -t w --restore
or short: discosync -t w -r